Share !

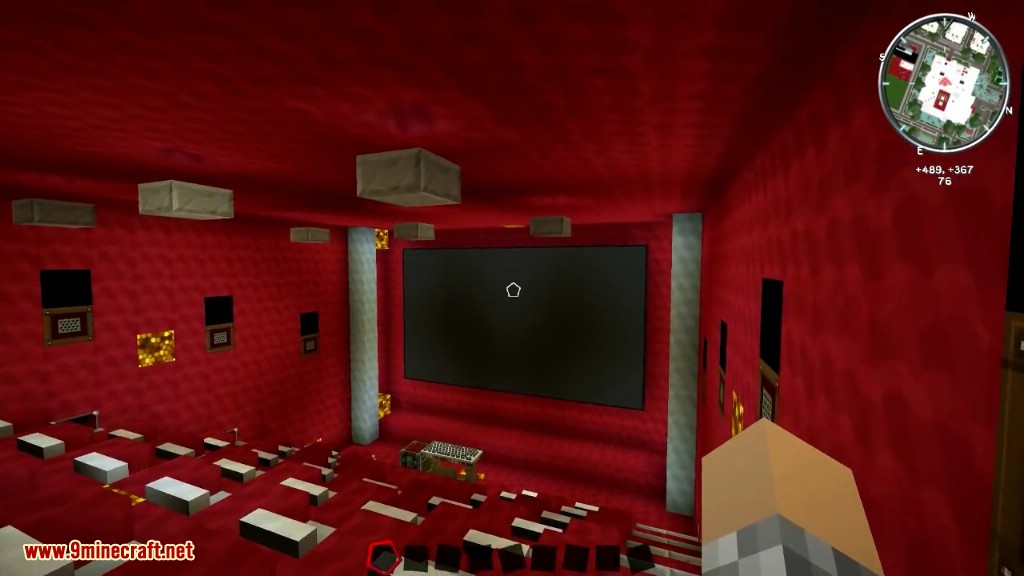
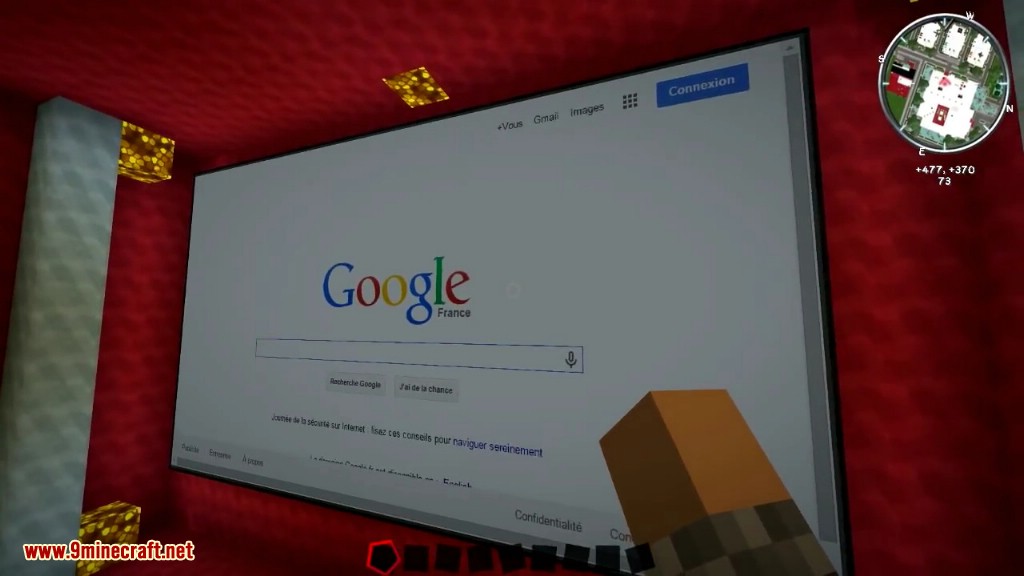
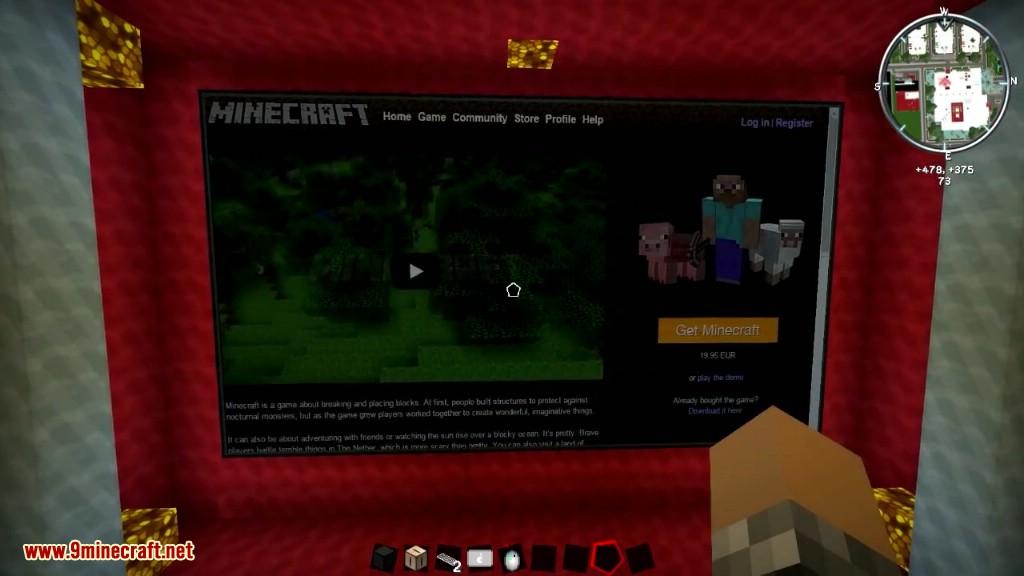
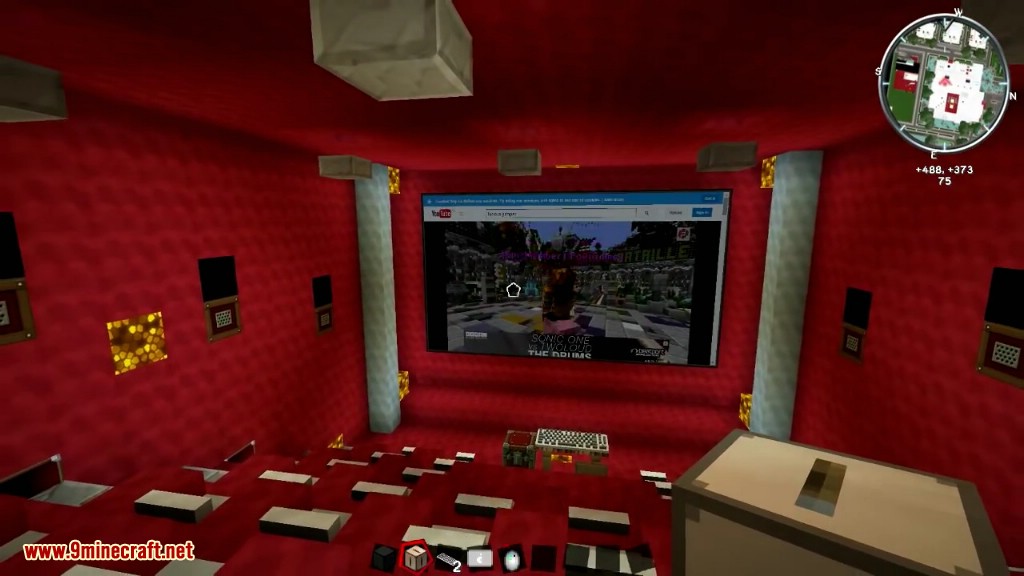
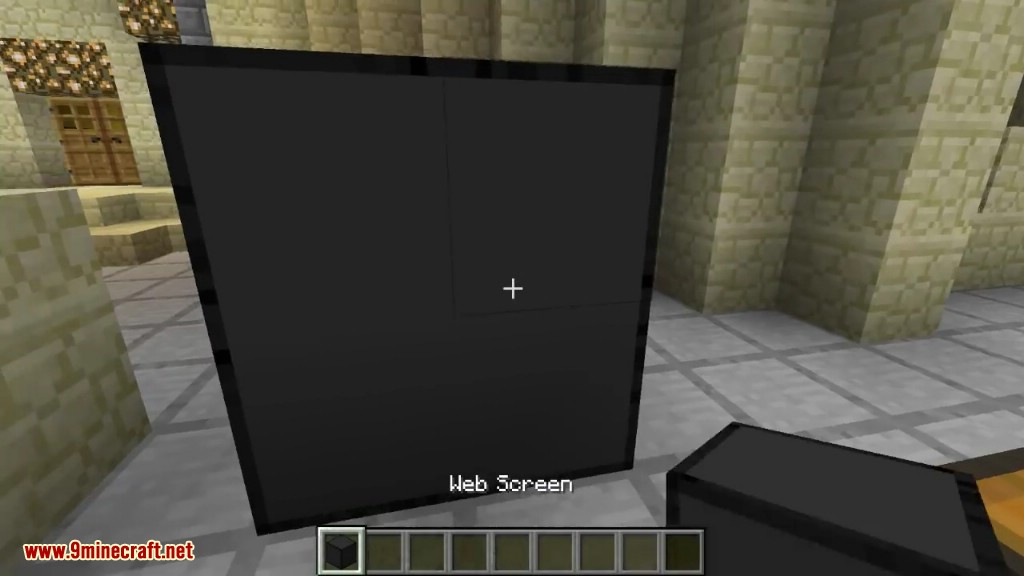
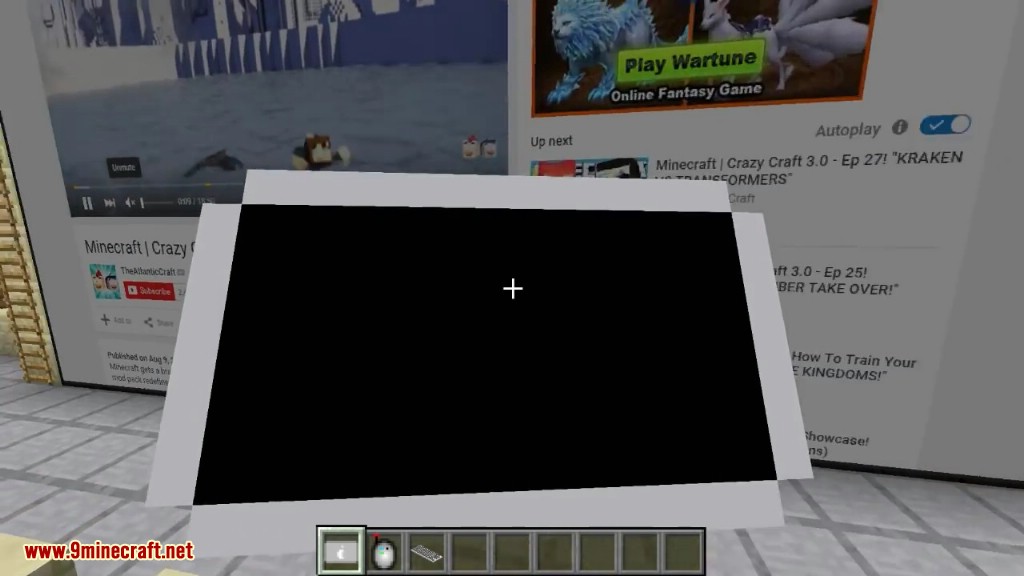
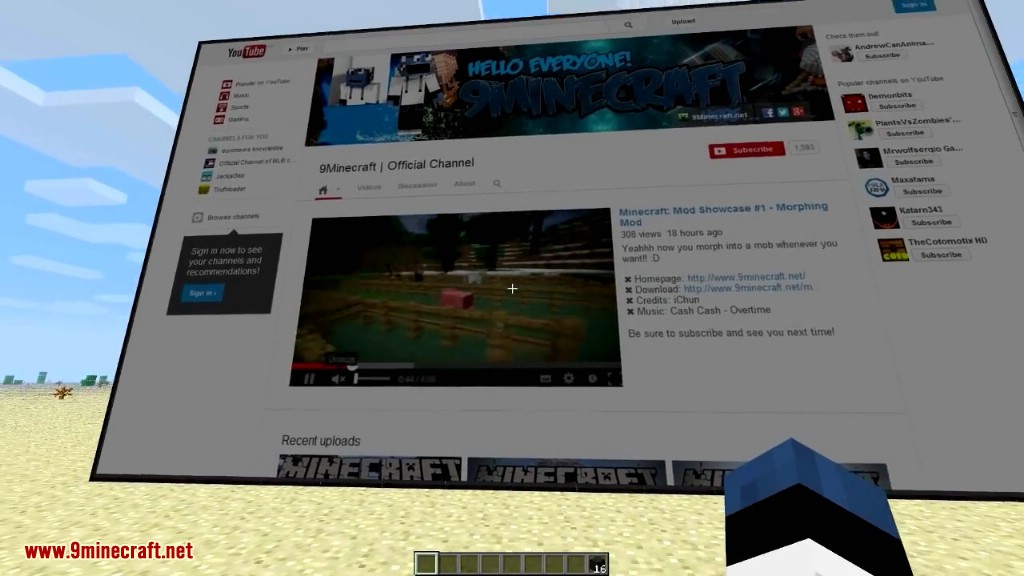
Web Displays Mod adds a Web Screen Block! So, what do you think this block will do ? Well, when you place a few of those blocks (144 in fact) in a 16x9x1 surface shape, and you right-click it, a real web browser shows up. You can go on YouTube, watch some videos or listen to your favourites musics, or watch the stream of your favourite streamer, and everything in-game.
Recipes:
The screen:
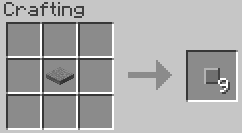
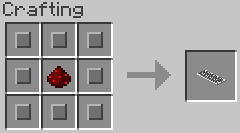
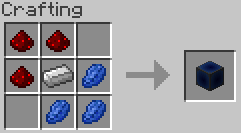
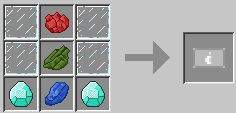
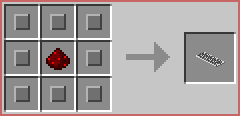
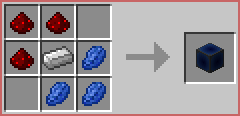
First, you need to craft 16×9 = 144 = 64 + 64 + 16 web screens blocks crafted like this:
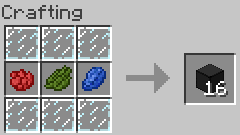
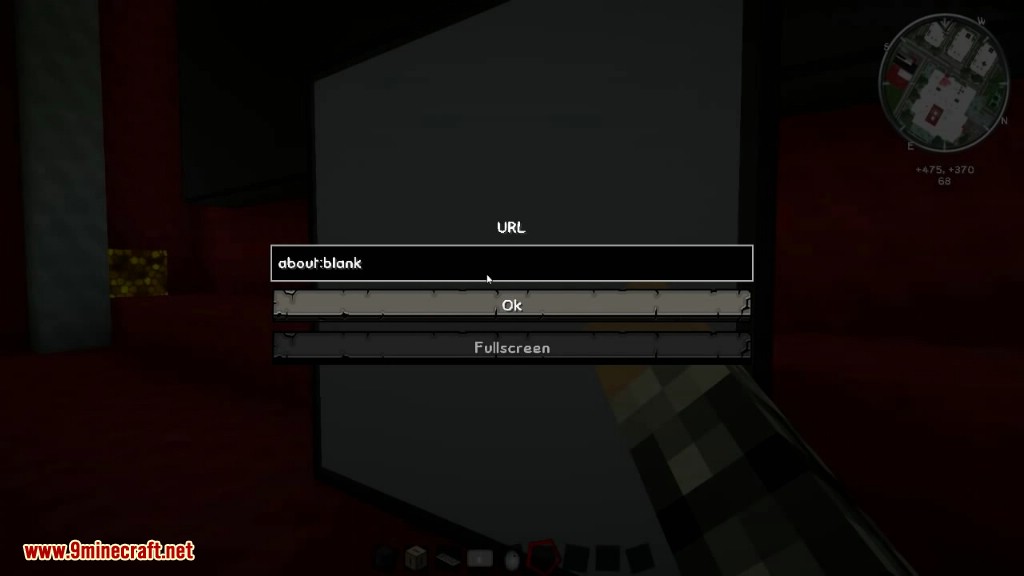
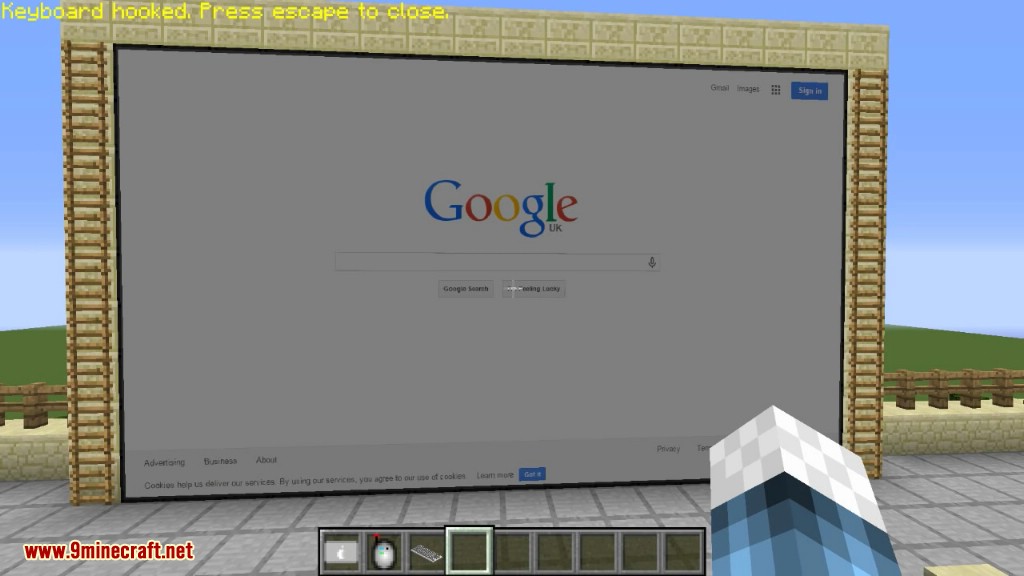
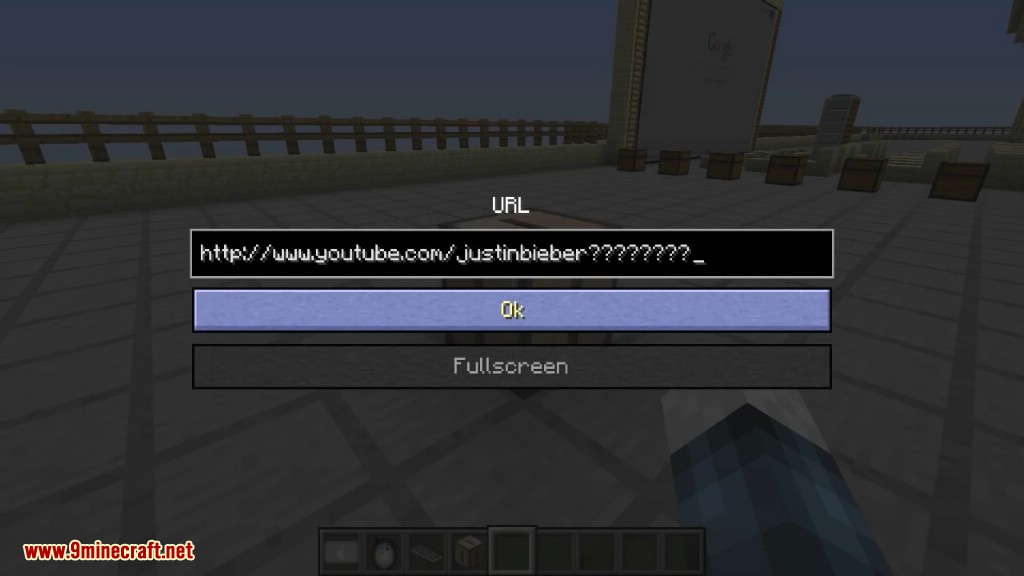
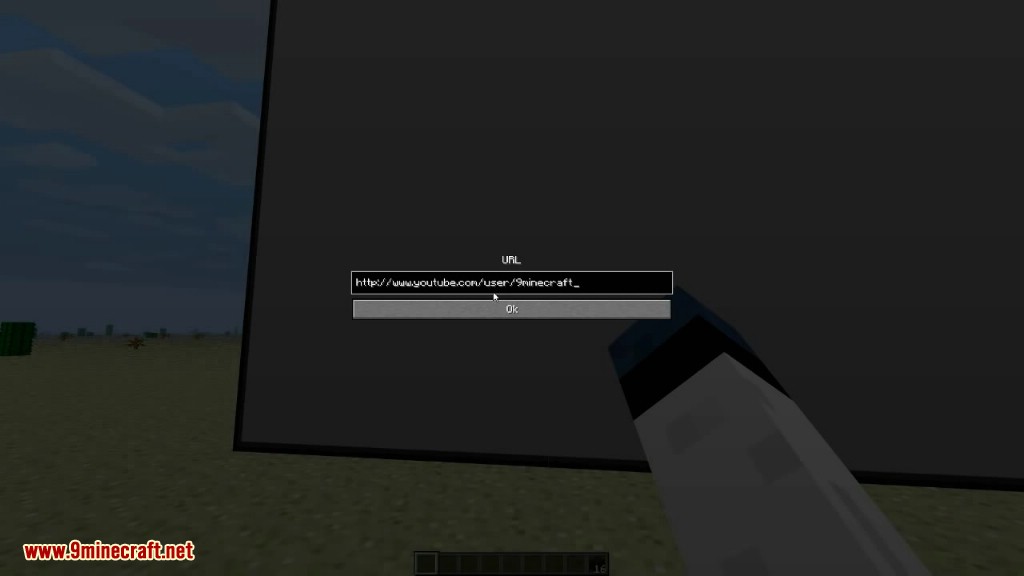
So, in fact, you will need 9 rose red, 9 catcus green, 9 lapis lazuli, and 54 glass panes. Then, build a 16×9 wall with them, and right click on the side where you want the screen to appear (check that you don’t have any items in your hand). That’s it, you created your screen. Shift-Right Click to change the URL. To click on a link/button, simply right-click it with nothing in the hand.
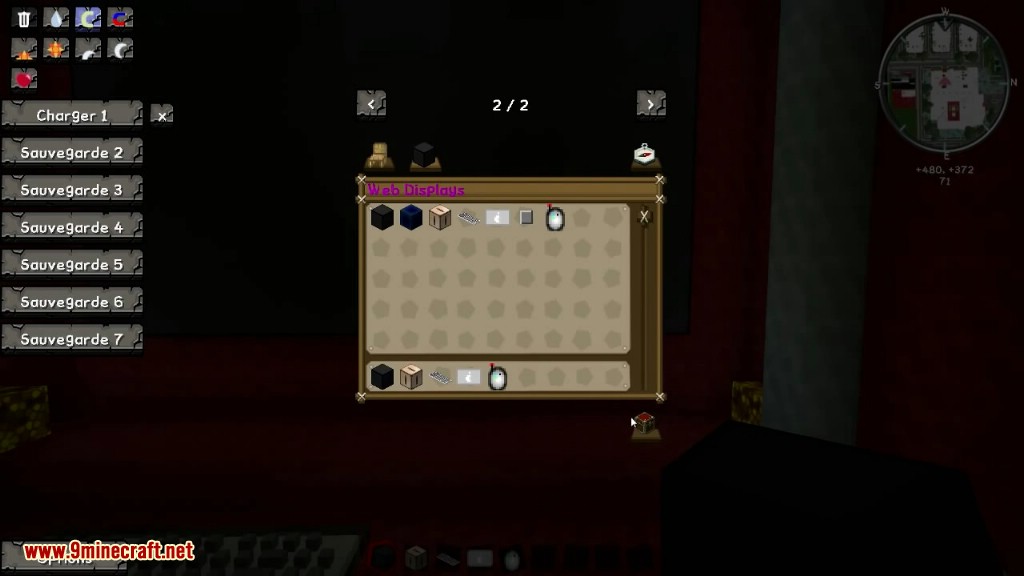
Peripherals:
Peripherals are blocks that can be connected to a screen using the Wireless Linker:
You have to right click the screen first and then the peripheral with it. Note that peripherals can be wherever you want in the world, there is no distance from the screen limit. It just have to be in the same dimension.
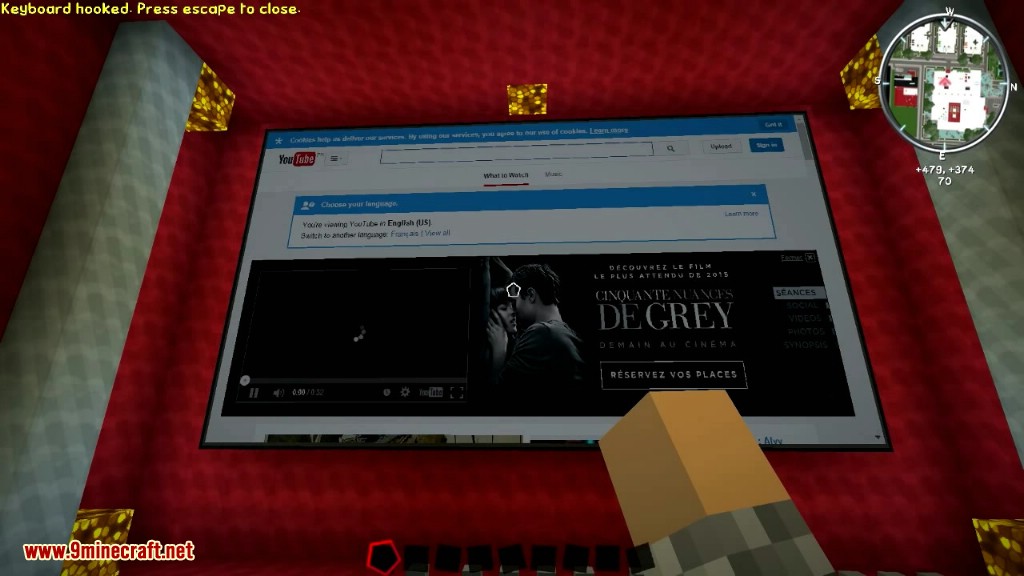
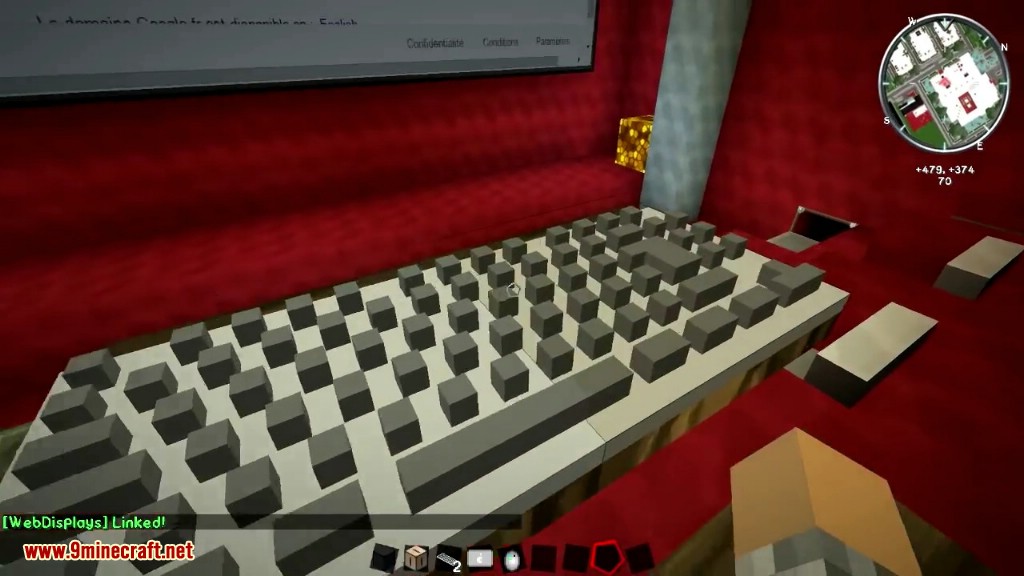
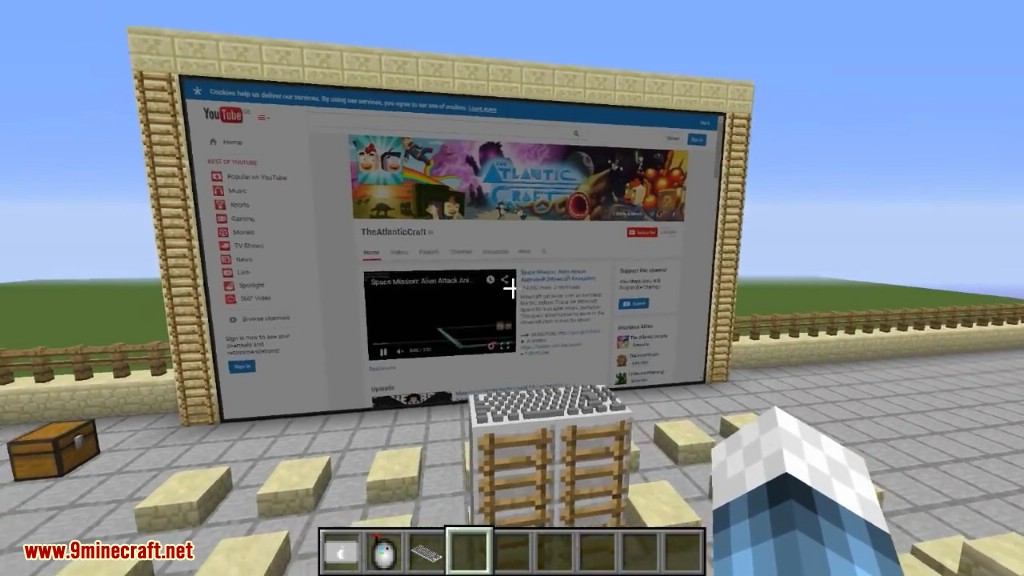
Peripheral #1: The keyboard:
To type things in the web screen, you’ll need the keyboard:
After linking it to a screen with the linker, just right-click it with nothing in the hand, type whatever you want, and press Escape when you have done.
Peripheral #2: The Computer Interface:
If you want to use ComputerCraft to interact with the screen, here is the computer interface:
After linking it to a screen using the linker, place a computer next to it. You can access its functions using peripheral.wrap(“SIDE_OF_THE_INTERFACE”)
To know which functions are available; you can watch my little tutorial here:
Peripheral #3: The Repeater:
This peripheral is a little bit special; it’ll repeat what a real screen will show (called “source”), but on another screen (called “repeater).
Build two 16×9 screen (using web screens blocks). Turn on the source screen (right-click it with nothing in the hand). Then, select it by right-clicking it using the wireless linker. Once the source has been selected, click on the second screen using the linker . That’s it
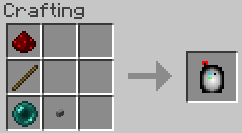
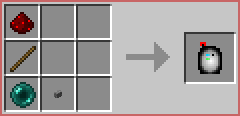
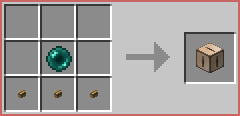
Peripheral #4: The Remote Controller:
Crafted like this:
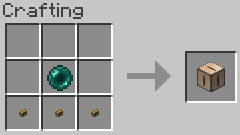
The Remote Controller once linked to a screen will enable you to change the URL of its linked screen wherever you want; this might be usefull to make a screen control room and change the URL from far.
Videos:
How to install:
- Download and install .
- Download the mod.
- Go to %appdata%.
- Go to .minecraft/mods folder.
- Drag and drop the downloaded jar (zip) file into it.
- If one does not exist you can create one.
- Enjoy the mod.
If you don’t have 32 bit windows:
Start the Minecraft launcher. Check that the selected Profile is Forge and click on “Edit Profile”.
In the “Java Settings” category, check “Executable” and in the text field put the path to your javaw.exe from your 32 bits Java ! Click Save profile and enjoy.
Adds a Web Screen Block that enables a real web browser to show up when you place a few of those blocks (144 in fact) in a 16x9x1 surface shape and right-click it. You can go on YouTube, or listen to your favourites musics, or watch the stream of your favourite streamer, and everything in-game.
Web Displays Mod Videos:
Web Displays Mod Recipes:
The screen:
First, you need to craft 16×9 = 144 = 64 + 64 + 16 web screens blocks crafted like this:
So, in fact, you will need 9 rose red, 9 catcus green, 9 lapis lazuli, and 54 glass panes. Then, build a 16×9 wall with them, and right click on the side where you want the screen to appear (check that you don’t have any items in your hand). That’s it, you created your screen. Shift-Right Click to change the URL. To click on a link/button, simply right-click it with nothing in the hand.
Peripherals:
Peripherals are blocks that can be connected to a screen using the Wireless Linker:
You have to right click the screen first and then the peripheral with it. Note that peripherals can be wherever you want in the world, there is no distance from the screen limit. It just have to be in the same dimension.
Peripheral #1: The keyboard:
To type things in the web screen, you’ll need the keyboard:
After linking it to a screen with the linker, just right-click it with nothing in the hand, type whatever you want, and press Escape when you have done.
Peripheral #2: The Computer Interface:
If you want to use ComputerCraft to interact with the screen, here is the computer interface:
After linking it to a screen using the linker, place a computer next to it. You can access its functions using peripheral.wrap(“SIDE_OF_THE_INTERFACE”)
To know which functions are available; you can watch my little tutorial here:
Peripheral #3: The Repeater:
This peripheral is a little bit special; it’ll repeat what a real screen will show (called “source”), but on another screen (called “repeater).
Build two 16×9 screen (using web screens blocks). Turn on the source screen (right-click it with nothing in the hand). Then, select it by right-clicking it using the wireless linker. Once the source has been selected, click on the second screen using the linker . That’s it
Peripheral #4: The Remote Controller:
Crafted like this:
The Remote Controller once linked to a screen will enable you to change the URL of its linked screen wherever you want; this might be usefull to make a screen control room and change the URL from far.
How to install Web Displays Mod for Minecraft:
- Download and install .
- Download the mod and WDlibs.
- Go to %appdata%.
- Go to .minecraft/mods folder.
- If the “mods” folder does not exist you can create one.
- Drag and drop the downloaded jar (zip) files into it.
- Enjoy the mod.
If you don’t have 32 bit windows:
| + Show » Select All | |
|---|---|
Start the Minecraft launcher. Check that the selected Profile is Forge and click on “Edit Profile”. To find your java 32bits path: Usually it’s Program Files (x86) >> Java >> jre7 >> bin >> javaw.exe if this file can’t be found, then open Program Files (x86) if this directory doesn’t exist, then you have a 32bit windows, just start the game. Go to the Java directory. If it doesn’t exist or if there is no folders inside it, then please Install java 32 bits. Now open the jreX folder or jdk1.X.Y_Z where X is at least 7 (can be higher but NOT lower. If it’s lower, install java 7 32 bits). Open the bin folder. You have found you java 32 bits path. Copy it and past it in the “Executable” field, don’t forget to add javaw.exe after it. Java 32bit download: Go and select “Windows offline (32-bit)”. |
|
Download Links:
For 1.7.10
For 1.7.2
For 1.6.4
For 1.6.2
Credits: BuildLight
Web Displays Mod 1.7.10 adds a Web Screen Block. It allows you to search the internet while in Minecraft. This is of the most unique mods of all time. You can create a large screen and do almost anything on the internet that you normally would do.
So, what do you think this block will do ? Well, when you place a few of those blocks (144 in fact) in a 16x9x1 surface shape, and you right-click it, a real web browser shows up. You can go on YouTube, watch some videos or listen to your favourites musics, or watch the stream of your favourite streamer, and everything in-game.
Screenshots:


Crafting Recipes:
The Screen:
First, you need to craft 16×9 = 144 = 64 + 64 + 16 web screens blocks crafted like this:
So, in fact, you will need 9 rose red, 9 catcus green, 9 lapis lazuli, and 54 glass panes. Then, build a 16×9 wall with them, and right click on the side where you want the screen to appear (check that you don’t have any items in your hand). That’s it, you created your screen. Shift-Right Click to change the URL. To click on a link/button, simply right-click it with nothing in the hand.
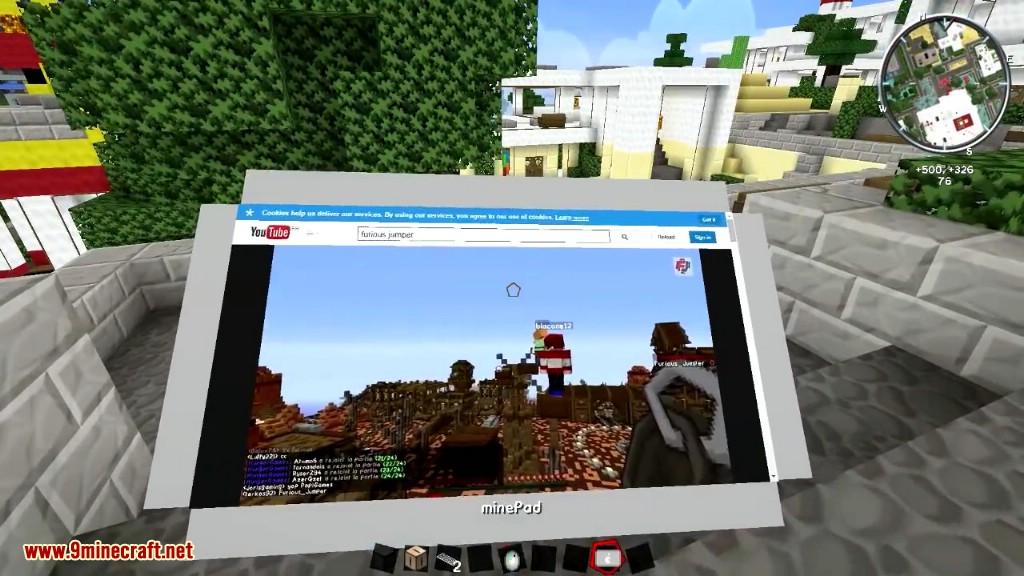
The minePad:
Ok, so you have a web browser in a block; now what about a web browser in an item? Here is the minePad: YAY!
Once you created it; you need to right-click a real screen (made out of web screens blocks) and you’ll see what is shown on the screen but on your this tablet!
Peripherals:
Peripherals are blocks that can be connected to a screen using the Wireless Linker:
You have to right click the screen first and then the peripheral with it. Note that peripherals can be wherever you want in the world, there is no distance from the screen limit. It just have to be in the same dimension.
Peripheral #1: The keyboard:
To type things in the web screen, you’ll need the keyboard:
After linking it to a screen with the linker, just right-click it with nothing in the hand, type whatever you want, and press Escape when you have done.
Peripheral #2: The Computer Interface:
If you want to use ComputerCraft to interact with the screen, here is the computer interface:
After linking it to a screen using the linker, place a computer next to it. You can access its functions using peripheral.wrap(“SIDE_OF_THE_INTERFACE”)
To know which functions are available; you can watch little tutorial here:
Peripheral #3: The Repeater:
This peripheral is a little bit special; it’ll repeat what a real screen will show (called “source”), but on another screen (called “repeater).
Build two 16×9 screen (using web screens blocks). Turn on the source screen (right-click it with nothing in the hand). Then, select it by right-clicking it using the wireless linker. Once the source has been selected, click on the second screen using the linker . That’s it
Peripheral #4: The Remote Controller:
Crafted like this:
The Remote Controller once linked to a screen will enable you to change the URL of its linked screen wherever you want; this might be usefull to make a screen control room and change the URL from far.
If you don’t have 32 bit windows:
Start the Minecraft launcher. Check that the selected Profile is Forge and click on “Edit Profile”. In the “Java Settings” category, check “Executable” and in the text field put the path to your javaw.exe from your 32 bits Java ! Click Save profile and enjoy.
To find your java 32bits path:
Usually it’s Program Files (x86) >> Java >> jre7 >> bin >> javaw.exe if this file can’t be found, then open Program Files (x86) if this directory doesn’t exist, then you have a 32bit windows, just start the game. Go to the Java directory. If it doesn’t exist or if there is no folders inside it, then please Install java 32 bits.
Now open the jreX folder or jdk1.X.Y_Z where X is at least 7 (can be higher but NOT lower. If it’s lower, install java 7 32 bits). Open the bin folder. You have found you java 32 bits path. Copy it and past it in the “Executable” field, don’t forget to add javaw.exe after it.
Java 32bit download:
Go and select “Windows offline (32-bit)”.
Requires:
How to install:
- Make sure you have already installed Minecraft Forge and Minecraft Chromium Embedded Framework (MCEF).
- Locate the minecraft application folder.
- On windows open Run from the start menu, type %appdata% and click Run.
- On mac open finder, hold down ALT and click Go then Library in the top menu bar. Open the folder Application Support and look for Minecraft.
- Place the mod you have just downloaded (.jar file) into the Mods folder.
- When you launch Minecraft and click the mods button you should now see the mod is installed.
Всё, что вам нужно – собрать огромный экран в игровом пространстве и щёлкнуть по нему ПКМ . С помощью него вы сможете смотреть видео, слушать музыку, и всё это в кубическом мире Майнкрафта.
Видео:
Рецепты мода Web Displays:
Экран:Вам понадобится дисплей размером 16×9 . Для этого необходимо изготовить 144 (2 стака + 16) экранных блока по следующему рецепту:

То есть, в целом, потребуется: по 9 красных, зелёных и синих красителей, а также 54 стеклянных панели. Полученные экранные блоки сложите в стену площадью 16×9 и щёлкните ПКМ по той стороне, на которой должен быть экран. Ваш дисплей готов! Если понадобится сменить сайт, используйте комбинацию Shift+ПКМ . Чтобы взаимодействовать с ссылками/кнопками, щёлкайте ПКМ без в руке.
Периферийные устройства:
К их числу относятся дополнительные компоненты для управления дисплеем. Все они соединяются с экраном благодаря беспроводному транслятору :
Для создания связи, щёлкните ПКМ по экрану, а затем по нужному устройству. Дистанция между экраном и его компонентами не ограничена, главное чтобы они находились в одном измерении.
Устройство #1. Клавиатура:
Она позволяет вводить данные на экран:

После привязки к экрану, щёлкните по клавиатуре ПКМ , чтобы начать ввод. Затем нажмите Esc , чтобы выйти.
Устройство #2. Интерфейс компьютера:
Позволяет взаимодействовать с экраном с помощью мода :
После привязки, поместите компьютер рядом с экраном. Получите доступ к его функциям с помощью команды peripheral.wrap(“SIDE_OF_THE_INTERFACE”) . Подробнее о встроенных командах в этом видео:
Устройство #3. Дупликатор:
Он представляет собой встроенную функцию для экрана, позволяющую транслировать изображение одного дисплея на другом.
Для этого создайте 2 экрана площадью 16×9 блоков. Включите главный экран и щёлкните по нему ПКМ с помощью транслятора. Затем проделайте то же самое со вторым экраном, и он выступит в роли дупликатора!
Устройство #4. Пульт управления:
Изготавливается по следующему рецепту:
После привязки, пульт позволяет менять URL экрана на расстоянии. Используйте эту функцию для создания центров управления дисплеем.
Как установить мод Web Displays для Minecraft:
- Для начала совершите установку
- Далее скачайте данный мод и библиотеку "WDlibs" (ссылка ниже)
- Откройте директорию игры (%appdata%\.minecraft) и найдите в ней папку mods (создайте, если её нет)
- Поместите туда скаченный вами файл
- Теперь все! Можно играть
Запустите клиент игры и зайдите в настройки профиля Forge. В категории «Java Settings» в графе «Executable» введите путь к вашему файлу javaw.exe на основе 32-битной Java. Сохранитесь и запускайте игру!
Как найти путь к 32-битной Java:
Обычно, путь выглядит следующим образом: «Program Files (x86)/Java/jre7/bin/javaw.exe». Если папки Program Files (x86) не существует, значит у вас 32-битный Windows – просто запускайте игру. Если же у вас нет папки Java или она пуста, значит необходимо установить 32-битную Java. Наконец, убедитесь, что у вас установлена Java 7 или выше.
Установка 32-битной Java:
Зайдите на официальный сайт Java и выберите «Windows offline (32-bit)».